Thursday, November 6, 2014

Not a piece of cake!


I thought this project would be a piece of cake (pun completely intended). I follow theartofplating.com, love color, consider myself a proficient designer and thought I could rock this project no problem! Little did I know that no amount of carefully planned sketches guarantee a well executed 3D product. 

+ pages of stencilcentric design
The inspiration for my approach came from a baked good I created years ago. I successfully dusted cocoa powder through a stencil onto cookies with great results and the idea of using a stencil for this plating project got burned into my brain.The majority of my sketches involved negative and positive forms. I came up with a myriad of ideas that revolved around incorporating a stencil. I considered using an orange and brown (chocolate) color palette, a yellow and brown pallet and a purple and brown color palette and in the end decided to use pink and brown and incorporate raspberry and rose flavors.

I found an awesome stencil on amazon and started dreaming about
how I'd use it while I waited for the package to arrive on my doorstep. Once it was in my hands, I was sort of shocked at how small it was and foresaw its size causing problems for my envisioned my technique. However, I pressed on and began amassing goods to use in experimenting. 

I acquired a bunch of materials which included:
  • two types of yogurt
  • two varieties of fruit leather
  • raspberries
  • chocolate covered sunflower seeds
  • raspberry jam
  • chocolate chips
  • a rectangular plate
  • stencil dauber
  • chocolate sauce
I also made a raspberry sauce, rose gelatin and chocolate "sheet".


Stencil experimentation
I experimented with different methods of cutting and applying the materials with the stencil. I created powders from: freeze dried raspberries, dried rose petals, chocolate covered sunflower seeds, and pink Himalayan salt. When using these powders with the stencil I applied a clearish "adhesive" (honey or corn syrup) within the stencil negative and dabbed the powder on top of the sticky substance. For the most part this worked. However, often removal of the stencil deposited powder in unintended areas.

The sauce I applied with a small paint dauber. The sauce had a tendency to bleed out under the stencil. 

I also used the stencil as a guide for cutting pieces out of a number of materials (fruit leather, gelatin, frozen chocolate sauce sheet).The most successful cutting involved fruit leather. 

After a lot trial and error I concluded that the stencil I had chosen was just too small and intricate for the methods I was attempting. Because the shapes within the stencil were so small and the spaces in between the shapes so slight, I was unable to devise a way to prevent powders and sauces from intermingling. I decided to switch gears slightly and determined that the only way I could work with a stencil was to select one with larger negative areas. Being that I was using rose as one of my flavors, I thought using a rose stencil would compliment the taste of the dish well. 

I found the Mackintosh rose and thought its dimensions
and proportions were perfect for a stencil! I cut out the negative shapes and began exploring this new composition. Below are two iterations. The one on the left is composed of all cut cake shapes powdered with raspberry dust with sauce resting under the cake. On the right the cut cake shapes comprise only a portion of the overall rose shape with the other shapes made from cocoa powder (representing the variety of powders I concocted and would use in the final). 


I felt the design that combined both
The final product
the "stenciled" cake shapes and the "stenciled" powders appeared crisper and cleaner. However, I think the with further tweaking the design implementing mostly cake shapes has a lot of potential. Overall, I think the downfall of my process was assuming that my ideas and 2D sketches would translate well through 3D materials. I attempted to exert too much control over unruly materials within a rigid structure.

Wednesday, October 15, 2014

Pleasant Pomes - Coulda, Shoulda, Woulda

I was excited for this project. Apples are one of my favorite fruits and I was eager to see what flavor combinations (beyond the obvious cinnamon, ginger, etc.) I might explore.

I had no problem coming up with ideas for potential 
(ideas - plus two more pages)
flavor pairings. Interesting combos included: apple + shitake mushroom, apple + wild rice + hazelnut, and apple + avocado + endive. However, I was stumped on what form the flavors would take!

After making a fennel, apple salad for my family, I determined I wanted to include fennel in my amuse bouche. By experimentation 
(lab) day I also had a clearer vision of the form - I knew I wanted to include a deep fried element. 


I brought many products to class and a several became deep fried goodies:
  • fennel rings
  • fennel straws 
  • apples sliced two ways 
  • smoked gouda (photo taken after it was devoured by hungry, curious classmates


What was discovered: 

  • smoked gouda is seriously delicious deep fried
  • deep fried fennel is slimy and not "anisey" enough
  • battered apples are pretty darn good fried
  • The combination of fennel, cheese and apple was satisfying 

Since the apple held up pretty well to frying, I decided to slice them to resemble thick cut fries. The batter on these bad boys was pretty thick. It resembled a pancake dough. I knew at this point I could execute the frying of the apples. But how to incorporate the fennel and cheese? 

Mike suggested I make a fennel ketchup
to accompany the apple fries. The plan was to juice the fennel, gel it and mix it with a bit of parsley juice (for color) with pickled fennel. I brunoised (a new-to-me cutting technique) a fennel bulb, then boiled vinegar, water, sugar and salt and placed everything in an airtight container in the fridge for a week.


I wasn't sure the batter was appropriate for the apples after all and decided to do a tempura batter for the final. Although, experienced with deep frying (my husband and I have mastered the beer battered cheese curd), I was upset that my apple fries turned out rather limp. However, I knew immediately (after the damage was done) what I could have done differently. In fact, in retrospect there are several things I would change if I had a second change. 

1. Keep tempura batter cold - add ice directly to batter if need be. 
2. Mix tempura batter ingredients lightly to prevent gluten development - it's okay if the tempura is lumpy. 
3. Salt tempura batter generously.  
4. Cut the apples into thinner slices. 
5. Dredge apple slices in flour prior to dipping in batter to help batter adhere to the surface of the apple. 

Below is the recipe adjusted based on the what I learned from the process. Although, I'm sure further tweaking and testing would be helpful. 

RECIPE - TEMPURA APPLES with FENNEL KETCHUP

Fennel Ketchup 
(Fennel Pickles + Fennel Juice Agar)

Juice enough parsley to result in 2 tsp liquid. Set aside.

Fennel Pickle
1 bulb fennel - brunoised
1 1/4 cup vinegar
3/4 cup water
1/4 cup granulated sugar
1 tsp salt

Directions
Simmer vinegar, water, sugar and salt until sugar has dissolved. Cool slightly and place in an air tight container in the fridge overnight or up to one week. 

Fennel Juice Agar
1 cup fennel juice 
1 tsp agar

Directions
Bring fennel juice to a boil over medium heat. Slowly whisk in agar. Whisk until agar is dissolved, approximately 2-5 minutes. Set and chill in the refrigerator.

To make ketchup 
Using an immersion blender, mix gelled fennel juice with 1 tsp parsley juice, until a fluid gel consistency is reached. Stir in 1/2 cup fennel pickles and 2 tsp pickle liquid. 
Garnish with fennel fronds. 

Tempura Apple FriesIngredients
4-5 Granny Smith Apples  - 1/4"-1/2" julienned

2 cups ice
1 cup flour + 4 tbsp flour (separated)
1 tbsp cornstarch
1 1/2 cup extremely cold sparkling apple cider
1/2 tsp salt
4 cups vegetable oil (for frying)
1/4 cup freshly grated pecorino cheese


Directions
1. Spread 4 tbsp of flour on a plate.
2. Roll apple slices lightly in flour. Set aside.
3. Place ice in a large bowl. 
4. To make batter, combine 1 cup flour, cornstarch, cold sparkling apple cider and salt in a
    medium bowl. Mix lightly to incorporate. Place the mixture (still in bowl) into the large
    bowl of ice - batter needs to be kept cold, add additional ice to batter if necessary. 

5. Heat vegetable oil to 325F
6. Dip floured apples into batter. In batches of 4-5 slices, fry apples in oil until lightly browned. Remove apple slices from oil with a slotted spoon and drain on a paper towel. Sprinkle fried apple slices generously with pecorino. Serve with fennel ketchup.

Wednesday, September 24, 2014

Carrots for Kids!

DAY 1
The first day in the lab was spent testing out the juicer. I went home with a nice quantity of juice and a bunch of carrot pulp to experiment with. 
Juicing carrots is messy, but satisfying!


PROTOTYPES
What the f#@k is this?


Cheetos
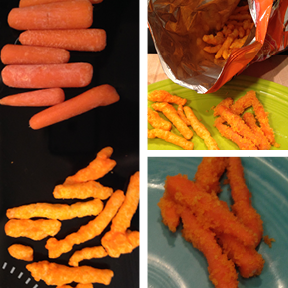
A play on Frito's crunchy cheese flavored snacks. I cut baby carrots into irregular shapes and rolled them in cheese powder (for the prototype I made cheese powder by pulverizing cheetos in a food processor). I was pleasantly surprised with the results which I considered to be a pretty convincing facsimile. This was a strong contender, but I wasn't sure it would stand out in a sea of carrots.


Sno-Cones
I used the juice made in the lab to make a granita at home. The process was surprisingly simple. I was actually intrigued by the shards of frozen carrot juice and considered pursuing using the shards in a seperate prototype however, I wasn't sure I could keep the product frozen long enough for presentation. The granita was tasty, but I felt the flavor was too potent for children. Also, because the granita melted so quickly,  I thought it may be too messy (the melting carrot juice had the potential to stain hands, clothing, furniture, faces, etc.).
Tic-Tac-Toe
I used colorful carrots cut into x's and o's as game pieces for the classic game tic-tac-toe. This task required some intricate cutting, thankfully no injuries occurred when my knife "skills" were put to the test. The "game board" was drawn in ranch dressing. While I think this idea would actually go over pretty well with kids, many of my classmates also had a version of tic-tac-toe in their set of prototypes, so I decided to skip it. 


Carrot Haystack & Sand 
Haystacks - "Haystacks" were created through the mounding of finely grated golden yellow carrots. The flavors of the haystack was to be a spin on a traditional carrot raisin salad (citrus, carrot, raisin, sugar). However, instead of the raisins being incorporated throughout the salad (and to adhere to the 95% carrot restriction) one raisin formed into the shape of a mouse would be discovered in the center of the haystack. While I was a fan of this concept, no one else seemed too stoked about raisins, so I axed this idea.
Sand - For the prototype I simply ground cheetos in a food processor until they resembled a large grain sand. My intention was to represent what dehydrated and ground carrots might look like.


Gel in a Shell
This prototype was created by allowing jello to set in a hollowed halved orange. I used jello out of a box for the experiment. I was pleased with the aesthetic, but concerned over the bitter taste emitted from the pith. 


Mashed potatoes and butter
For this prototype cooked carrots were mashed until they resembled carrots. I then cut a small square of golden yellow carrot which I placed on the top of the mash to resemble butter. I planned to use a butter extract to inject a concentrated buttery flavor, while staying within the 95% carrot guideline. This was one of my favorite concepts, but may be better suited as a dish for adults. 


Carrot Shapes
The most uninspired of the lot, this prototype is pretty ho-hum. It's hard to come up with 10 ideas!


Bubble Tea
I didn't experiment with making bubble tea at this stage of the game. I knew it would involve a lot of juice, which I didn't have at home. And I wanted to wait to buy the tapioca pearls used in "boba" tea until I knew this idea was a go. 


Carrot Toothpaste
My thought on this was that it would at least get the carrot into the kid's mouth. People were just too grossed out about this, so the idea was scrapped. 


FINAL RESULTS
With help from Barry and some of my classmates I narrowed down my prototypes to three finalists. Drum roll please....

Carrot Sand
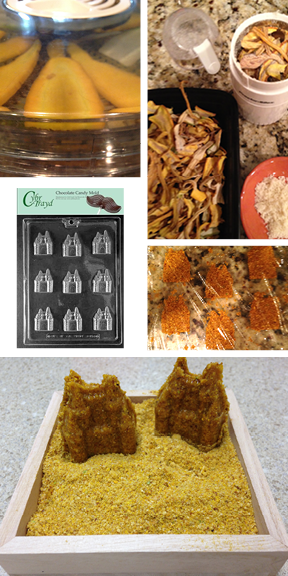
I just had to pursue this idea!!! I did a practice run with the dehydrating of carrots and discovered the ideal thickness of the carrot for this method and the proper time. The carrots were cut thinly on a mandoline and dried in the dehydrator for over 15 hrs. Because I tested the dehydrating prior to executing the final, I was aware of just how many carrots would be needed. An entire bag + 3-4 carrots resulted in about 3/4 cup of carrot "sand". I added approximately 2tsps ground dried coconut (the yummy stuff from Trader Joe's), a pinch of sugar, and a pinch of salt. To construct the castle, I added a tsp of butter to a portion of my sand and pressed the mixture into a castle mold acquired from amazon. I then froze the carrot sand castle overnight to insure its stability. Initially, I had planned to present the carrot sand on 12 individual blue plates with miniature shovels and pails, however after scouring the internet for such items I came up with no food safe, reasonably affordable options. In addition, I estimated I would need a LOT, I mean a TON of carrots to make enough sand for 12 servings. And then it occured to me - sand boxes are a communal space, why not make the experience of eating the carrot sand communal? Finding the sandbox "serving" vessel and castle mold sealed the deal! While I'm not sure the sand is successful as a stand alone dish, I think the potential for use as an ice cream topping, dredge, breading, etc. made it a seriously successful experiment.


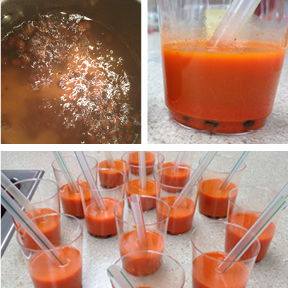
Carrot "Bubble Tea" Purchasing the tapioca pearl bubbles gave me an excuse to go to one of my favorite shopping destinations - the Asian grocery - what a wonderland! The process of creating this was pretty straightforward although the cooking of the tapioca took a little finesse. After cooking the pearls I steeped them in a simple syrup infused with ginger juice. I was disappointed that the tapioca pearls absorbed next to none of the ginger flavor. To the 3 cups carrot juice I added a small quantity of lemon juice (1-2 tbsp) t in an attempt to "brighten" the flavor, although I think it could have used a bit more citrus. I discovered through this "product" how fond I am of carrot juice - wish I had a juicer at home!


Gel in a shell (carrot gelatin in an orange peel)
I didn't feel that the idea of presenting "jell-o" in an orange shell was that unique. However, I thought it would be hugely successful with children. The texture of gelatin is familiar to kids, plus slurping the gelatin from the peel would get them to interact with their food. As I mentioned in the prototype section, I was concerned about the bitter pithy flavor from the peel. Mike of La Bel Vie suggested I blanch the shell prior to removing the flesh. I'm not sure it was successful. I was left with a limp, still pithy shell. But it was worth a shot. I was shocked by the viscosity of the gelatin. In retrospect, there was a lot of carrot juice in the recipe. If I had it to do over again, I might substitute a portion of the carrot juice with water or orange juice (which I did use a small amount of).  


This was an awesome experience!